The universal color code car stereo wiring diagram is in front of you. Spend some time here on this page and learn all about the color code car stereo wiring diagrams! Who doesn’t appreciate cruising in their automobile while listening to nice music? It’s one of the most effective ways to listen to music without problems (mobile ringing, someone calls, etc.). You may always invest in a better automobile sound system. Only if you aren’t ok with the present music output from your car’s stereo. Also, if you have a basic setup that is factory version.
Many automobile enthusiasts like to handle their upgrades, and if you are one of them, a basic car stereo wiring diagram will come in handy. Let’s take a deeper look at the car stereo wiring using the wire color guide, replacing the old stereo with a new one, and a basic aftermarket car stereo wiring diagram in this guide.
Invest In A New Car Stereo
Spend some time visiting auto accessory stores and doing some research online if you want to update your car sound. Sony, Kenwood, Pioneer, JBL, Alpine, JCV, and many other brands are available. Shortlist a few and, if possible, get a demo from a retailer. A sample setup for evaluating stereos, speakers, and subwoofers is common among store owners. If you are fortunate enough to have access to a demo, it will undoubtedly assist you in making a purchase.
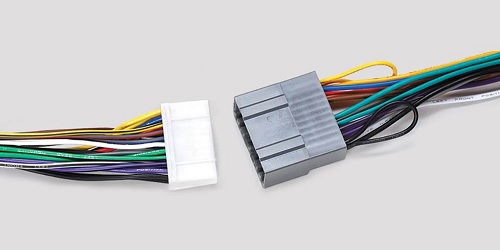
All of the required wiring, adapters, and accessories are included with most new car stereos. You’ll also receive a Car Stereo Wiring Diagram, which will be printed on the stereo or a separate piece of paper.
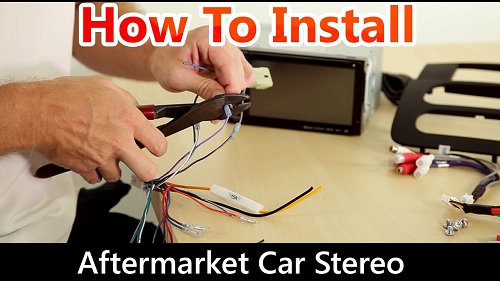
Remove the old stereo system.
After that, we’ll take out the old stereo from our automobile. Disconnecting the battery is the first and most critical step in removing the existing stereo. The battery of an automobile is usually found under the hood, in the engine compartment. You don’t need to remove or disconnect the battery. Only loosen the negative terminal and detach it by removing the terminal. The positive terminal can be left alone.
Ensure that the negative cable from the battery is appropriately tucked away from the battery’s negative terminal to avoid any unintentional contact.
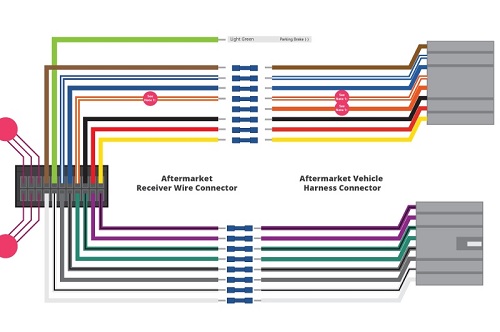
Color Code Car Stereo Wiring Diagram
We may now remove the old stereo after disconnecting the battery. Most cars have a plastic trim around the head unit, which may also hide the middle two AC vents. Finally, remove the plastic trim with a spudger, preferably one made of plastic to avoid damaging the trim.
You’ll now be able to use the head unit. The head unit in your automobile will now begin using spring clips or bolts, depending on the type. A plastic trim cover is commonly missing from spring clip-mounted head units. To remove the spring clip-mounted head unit, you’ll need a specific tool.
The majority of current automobiles are bolt-on. If you’ve already removed the plastic trim cover, you’ll be able to see the bolts that hold the head unit in place. You may easily separate the head unit by removing those bolts with a screwdriver (Phillips or Flat Head, depending on the type of bolts).
You’ll be able to reach the back wire once you’ve removed the head unit. To completely remove the old stereo, also disconnect all of the wires from the head unit.
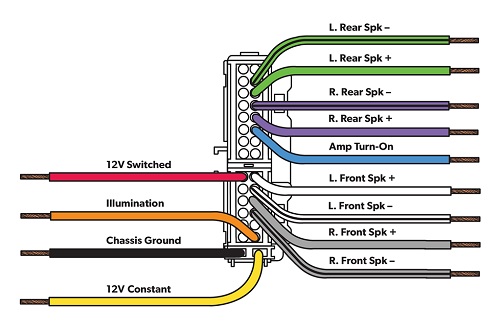
Wire Color Guide / Car Stereo Wiring Diagram
Let’s take a short look at a common car stereo wiring diagram or the Wire color guide before we look at how to install a new car stereo. Then the car radio cable color guide is available in the table and image below.
Putting In A New Stereo
You may need to acquire a harness adaptor to plug wires into the new stereo/head unit if your old stereo doesn’t have any clips. If the old wiring has clips, you can easily connect it to the new head unit. You may also have additional clips for an antenna, USB port, reversing camera, or any lighting, in addition to the power and speakers. Make sure all relevant connections are in and any wires are firmly so they don’t rattle around and cause an annoyance.
After all of the wiring is ok, it’s time to put the new head unit to the test. Simply slide the stereo to avoid tripping over it without fully inserting the new head unit. Reconnect the negative wire to the battery also and turn on the engine. Check to see if all of the new stereo functions are operational. If everything is in working order, switch the car off and unhook the negative wire from the battery.
Slide the new head unit/stereo into its designated space after slowly pushing all of the wirings into the slot. Reinstall the plastic trim cover and secure the new stereo with the screws. You can now link the negative wire to the battery and enjoy your new stereo if you are ok with the installation.
Conclusion
A straightforward approach to replacing outdated car audio with a new one. We learned the fundamental automobile radio wiring diagram in the process, which includes all of the major wires and their color designations.
Finally, if you’re a vehicle enthusiast willing to put in some effort, you can easily replace the outdated stereo yourself. However, if you are not at ease, you should seek out a reputable auto repair business. It should just take a couple of hours to complete the task. Good luck folks!


