This post is about how to upgrade the stereo system in your Accord Sedna. What are your options? So, what you can do? What do you need to do? How to make it even better? Find all answers on this page along with much other useful information!
The Honda Accord is a mid-size sedan that was introduced in 1995. Driving a sedan is similar to eating a stale bran muffin. You have to do it if you have to, but it’s not something to look forward to. Unless you’re driving a Honda Accord sedan, that is more like a new, warm chocolate muffin with a good slab of butter and a dash of spicy sauce. Sensible does not have to be dry or unappealing.
Here, on this website, you can also check how to get your lost Accord radio code! Below you will get a lot of information on how to upgrade the stereo system on your Accord Sedan!
Stereo System From The Factory
Honda, of course, does “sensible” like nobody’s business. They also do an excellent job of remembering that there is still a person behind the wheel who wants to get involved and entertained by the whole affair. The ninth-generation Accord accomplishes this, as well as being attractive, comfy, and well-built by Honda. It’s no surprise that the items are selling like hotcakes. Or, for that matter, bran muffins. Perhaps bran hotcakes?

The original stereos are as dependable as the rest of the Accord, but even the top-of-the-line models might benefit from an upgrade. Adding aftermarket audio to your Accord will make it even more pleasurable to drive.
Regardless of whether you have the base receiver or the alternate navigation receiver, the Accord’s stock stereos are quite good. The Honda Accord was the first of many popular cars to offer Apple CarPlay as a standard option in 2016. That year, Android Auto was also available, thus the available receivers were good. If we’re being honest, it’s probably better than decent.
The Accord sedan comes standard with a 4-speaker system and can be upgraded to a premium 7-speaker system with a subwoofer. These speakers, like the receivers, are adequate, but if you’re serious about sound, you’ll want to replace the existing system and add aftermarket components.
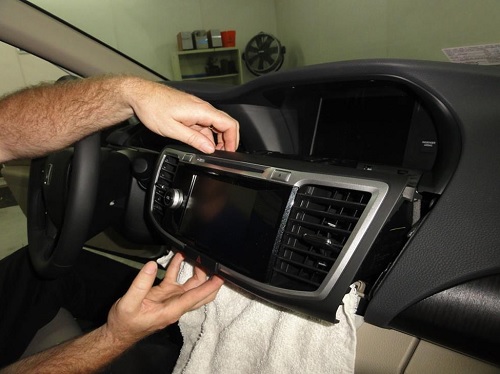
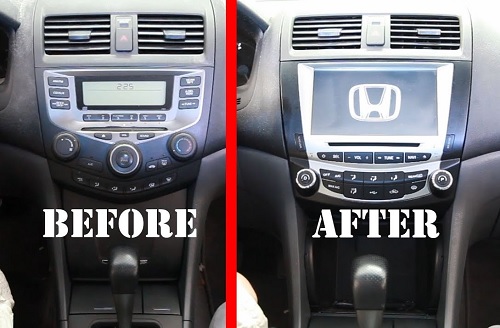
The receivers are located in the center of the dash stack, beneath the screen that controls car functions and controls the rear-view camera. You may replace the base receiver and keep the upper screen by using an aftermarket dash kit, which is included at a significant discount with your Crutchfield purchase.
Upgrade The Stereo System In Your Accord Sedan
There are some things that you must know for sure if you want to learn how to upgrade the stereo system on your Accord sedan. You’ll lose the factory AUX and USB ports, as well as the stock XM satellite radio and navigation system, when you replace the factory base radio (if present). This may appear to be a disadvantage, but there are lots of receivers that will provide you with all of these features and more, so don’t be concerned.
For the 2016 and 2017 Accords equipped with the 7″ LCD screen, replacing the radio is not recommended. However, as previously stated, it is not that horrible, and when you replace the speakers, you will notice a significant improvement in audio quality.
Removing and replacing the qualifying factory receivers is a relatively simple task that just necessitates the use of basic tools. You’re ready to study your Crutchfield MasterSheet and begin to work once you’ve set the parking brake and disconnected the negative battery line to avoid an electrical short.
Removal Process
If you want to upgrade the stereo system on your Accord sedan then you must remove the system from its original place in your vehicle! Using a panel tool, pull out the receiver side panel by releasing four holding clips. To remove the panel, disconnect the electrical harness and hose. Keep that panel tool handy because the next step is to pull up the top receiver trim panel from the back edge. You’ll need to release ten retaining clips, so be careful. Be patient and meticulous in your efforts. After that, you can remove the panel and the two Phillips screws that were exposed when you removed the panel.
Pry out the console side trim panels starting at the back borders by loosening five retaining clips on each panel. Remove the two Phillips screws that secure the console pocket to the dash, then the two 8mm bolts that secure the bottom receiver brackets to the dash. After that, you’re ready to pry the factory radio out (releasing six more retaining clips). Remove it, unplug everything, and tuck it away.
As previously stated, ordering from Crutchfield saves you a lot of money on the necessary dash kit and wire harness for replacing the factory radio. Refer to the instructions that came with the dash kit and harness to complete the installation. After you’ve connected everything, make sure to test the receiver before closing everything up. And, if you have any problems, keep in mind that your Crutchfield purchase includes free tech assistance for the life of your equipment.
Panel tool, Phillips screwdriver, 8mm socket, ratchet, and extension are all required tools.
Audio Controls On The Steering Wheel
When you install a new radio in your Accord, it’s pretty simple to keep the steering wheel audio controls. Our database will pick the adapter you need to make your factory steering wheel controls function with your new receiver when you enter your card details.
Replacing The Speakers That Came With Your Car
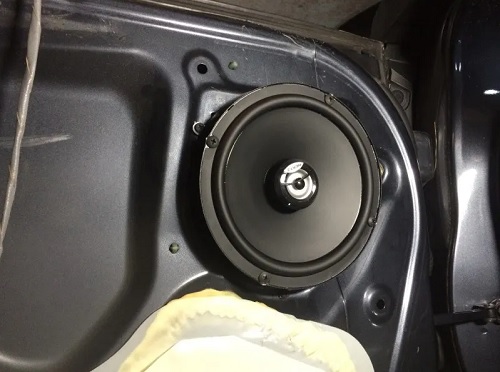
Speakers can be found in the front doors and rear deck, depending on your car’s options. They’re all rather simple to install, so even if you’re new to DIY car audio, you can save money while having fun with your vehicle.
The 6- and 7-speaker systems in the Accord sedan have sail panel tweeters, although the 4-speaker versions do not. In any case, removing the door panels begins with the sail panel. You’ll need to unplug the tweeter if it’s present. If not, simply remove the panel and proceed.
Move on down the door and deal with a few “fiddly bits” that need to be handled before you remove the door panel, using a panel tool to pry off the sail panel and deal with the tweeter (if there).
Pull out the screw cover behind the door release with the pry point (you’ll see it) and remove the two exposed Phillips screws. Start prying away the power options switch panel from the front edge. Set it aside after disconnecting the harnesses. You’ll need to remove another Phillips screw as a result of this.
To loosen nine holding clips, pry out the sides and bottom of the door panel. While you’re doing this, keep in mind that Honda builds a tight automobile. Pry out the door lock and release assembly, then twist the courtesy light assembly to remove it. After you’ve completed all of this, you can remove the door panel and deal with the speakers.
Taking Off The Front Door Speakers On Your Accord
All of the information about removing and replacing speakers can be found in your MasterSheet, but there are a few things you should know first.
To begin, the tweeters do not come with mounting brackets, so you’ll have to make your own or use our universal backstraps (or hot glue or silicone) to put them in place. There’s also no wire harness adapter, so you’ll have to connect the tweeters to the stock wiring with Posi-Products speaker connectors.
Each woofer is held in place by an 8mm screw that is simple to remove. The plastic ring surrounding the grille on the back of the door panel must also be removed. This ring must be removed to make room for your new speaker, so carefully cut it away with a tool knife.
Test the speakers after they’ve been installed to ensure they’re operating properly, as well as the locks and windows. If everything seems good, begin reassembling the door by reversing the removal process.
Panel tool, Phillips screwdriver, small flat blade screwdriver, 8mm socket, ratchet, and extension are all required tools.
The rear deck speakers are 6-3/4″ versions that need to be replaced with ones of the same size. The job isn’t difficult, however, there are a few steps to follow, so be careful, organized, and patient.
To begin, press down on the cushions and unscrew the 10mm bolt that connects the back seat back to the seat bottom. Set that aside, then press down on the bottom cushion’s front edge and squeeze the release tabs along the front edge to release the cushion. Remove the cushion and fold the back of the rear seat down.
Removing The Rear Deck Speakers From Your Accord
Remove the 10mm bolt from the bottom edge of the back seat side bolster, then lift and remove the bolster. Pull the door gasket away from the body along the rear pillar now that that’s out of the way. Pry off the rear pillar trim piece from the top edge to release three holding clips. Rep on the opposite side of the vehicle.
Remove the five retention clips at the front edge of the rear deck panel, then carefully pull the panel up to remove the remaining eight retaining clips. Pull the seat belts through the slots on each side of the deck panel after disconnecting the third brake light harness. After that, you can remove the panel and the 8mm bolts that secure it.
It’s now time to connect and secure the new speakers, then test them for functionality. If they are, you’re ready to reassemble the deck. Of course, make sure the seatbelts and third brake light are in functioning order before you finish.
Panel tool, Phillips screwdriver, 8mm socket, ratchet, and extension are all required tools. In your Honda Accord, there’s a lot of bass.
If your Accord sedan has the factory-installed 8″ rear deck subwoofer, you’ll access it the same way you did the rear deck speakers. As a result, we strongly advise you to replace all three speakers at the same time to save time in the future.
Other Sedan Choices For Upgrade The Stereo System In Your Honda Accord
There is yet another reason we encourage that strategy: it’s not straightforward to remove the deck once it’s been removed. The not-so-fun portion of this job is modifying the cavity to accommodate a new sub. The stock sub is 8.573, which is a good value “in diameter, but it tapers sharply near the magnet, posing a difficulty with the existing cutting diameter.
It is possible to solve this problem, however, it is not simple. You can get a 7.153 by cutting the rear deck steel “cutout diameter. Plus you can remove the back of the grille’s plastic ring to gain some extra height. You’ll also need to make a bracket for the new sub once that’s done.
Overall, this is not a project for the typical do-it-yourselfer. If you’re not confident in your ability to cut metal and fabricate brackets and other components, you should probably hire a professional car audio installer.
You may, of course, keep the stock sub and improve your bass with different methods. The sedan’s trunk has a subwoofer enclosure capacity of 46″ W x 16″ H x 34″/44″ D, which is plenty to fit some serious boom. If you still need room for heavy luggage, a smaller powered subwoofer would suffice.
The Hybrid sedan is a little different, with dimensions of 44″ W × 19″ H x 22″/22″. Panel tool, Phillips screwdriver, 10mm socket, ratchet, and extension, saw, professional assistance (stock sub).
Include Amplification (or two)
There are plenty of additional ways to enhance the performance of your Accord car. Crutchfield can assist you in a variety of ways.
The best way to get the most out of your new speakers is to invest in a new 4-channel amplifier. You’ll have cleaner power (and a lot more of it), which will result in significantly improved sound. A mono amp can also offer the power your new rear deck subwoofer requires.
Keep Your Accord’s Floors Safe
Factory floor mats are made to fill a space as inexpensively as possible. It means they look bad and wear out rapidly. The carpeting in your Accord will be protected from filth, damage, and whatever else life throws at it if you replace the worn-out old mats with premium WeatherTech floor liners. They also have a sporty flair to them, which is a good touch in a car like this.
Security And Remote Start Systems
You can warm up your vehicle in the winter or cool it down in the summer. You can do that by adding remote start functionality to it. We highly recommend the data start system! It is extremely convenient and makes installing a remote start system easier than before.
To connect with your vehicle’s computer, security, and ignition systems, the module requires a vehicle-specific T-harness (available separately)! So please contact us to order so that we can make sure you get the proper harness for your ride.
You can also discuss a security system with your Crutchfield Advisor. They’re not as simple to install (we normally recommend hiring a technician). We can assist you in selecting a system that will work in your vehicle. Do you learn to upgrade the stereo system on your Accord sedan? Write us in the comments if you have some issues or things that you want to mention!


