The Honda Civic radio replacement guide is available in this post. Here you can learn how to remove the old radio device from your Honda Civic vehicle, and how to complete the installation process on the new device. Our website can also help you to find workable Civic radio codes!
How To Install A Car Stereo In A Honda Civic
A stock radio can leave a lot to be desired, so updating it could unlock some hitherto unrealized audio possibilities. To understand how to install vehicle audio in your Honda Civic, keep reading. The Honda Civic is recognized for its dependability and effectiveness, but not for its sound system.
Upgrading your radio is the way to go if you want to give yourself and your passengers a better music experience. A few body panels and some wiring must be removed to install a new radio. If you don’t feel comfortable with it, you might want to go to a store. If you’re up for the challenge, keep reading to find out how to install car audio in your Honda Civic.
Steps To Complete Honda Civic Radio Replacement
- Remove the body panels and disconnect the battery. Loosen the bolt from the battery’s negative (black) lead with an 8mm socket and ratchet. Disconnect the negative battery terminal after that. Remove the two screws above the cigarette lighter socket with a Phillips screwdriver. Remove two Phillips screws from the top left and bottom left corners of the glove box by opening the compartment. Remove the three Phillips screws from the dash panel on the driver’s side. The center console, glove box compartment, and driver’s side dash panels are available free.
- Disconnect the connectors. Unplug the connector on the back of the cigarette lighter after removing the panels. On the rear of the stereo, look for the light blue and brown (stereo and speaker) connectors. Pull the connector out by pressing down on the clip. Next, unplug the antenna cable from the stereo’s back.
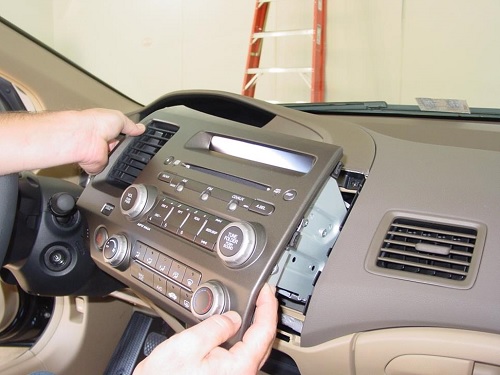
- Take the stereo out of the room. Grab the top and bottom trim of the stereo cover with both hands. It’s up to the stereo. Carefully pull out the trim, as well as the stereo that is on it. Do not remove the stereo bracket from the trim because it will make the installation easier. Remove two screws along the right side of the stereo bracket using a Phillips screwdriver, facing the front of the stereo. Then, on the left side of the stereo bracket, remove one Phillips screw.
Final Actions
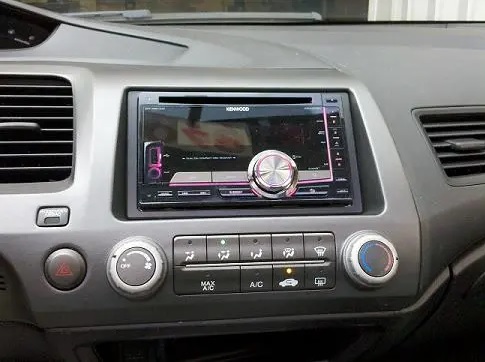
Put the new stereo in place. Install the new stereo in the opposite sequence as the previous instructions. Place the new stereo in the bracket and screw it in place. Connect the antenna. Then, connect the stereo and speaker cables. Connect the cigarette lighter plug. Replace the dash panel on the driver’s side and the glove box compartment. Replace the console panel in the center. Connect the negative (black) battery terminal to the positive (white) battery terminal. To test the new stereo, start your automobile.
We hope that now you can perform the Honda Civic radio replacement without and problem. Good luck!


